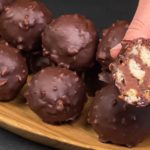
Ingredientes:
- 500 g de galletas trituradas
- 120 g de maní, picado
- 120 g de azúcar
- 60 g de cacao en polvo
- 250 ml de leche
- 150 g de mantequilla
- Una pizca de vainillina
- 80 gramos de chocolate amargo
- 80g de chocolate con leche
- 20 ml de aceite vegetal
- 50 g de maní picado (para decorar)
Direcciones:
Preparar la mezcla de galletas:
- Triture las galletas hasta obtener migajas finas y mézclelas con 120 g de maní picado en un bol grande.
Haz la mezcla de cacao:
- En una cacerola, combine el azúcar, el cacao en polvo y la leche.
- Llevar la mezcla a ebullición, revolviendo continuamente para disolver el azúcar y el cacao.
- Una vez que hierva, reduzca el fuego y cocine a fuego lento durante 2 minutos.
- Retirar del fuego y agregar la mantequilla y una pizca de vainillina, revolviendo hasta que la mantequilla se derrita por completo y la mezcla quede suave.
- Deje que la mezcla de cacao se enfríe a temperatura ambiente.
Formar las bolas:
- Vierta la mezcla de cacao enfriada sobre la mezcla de galletas y maní.
- Mezclar bien hasta que todos los ingredientes estén bien combinados.
- Lubrique sus manos con aceite vegetal para evitar que se peguen.
- Forme bolitas con la mezcla, del tamaño de una nuez.
- Coloca las bolas en una bandeja para hornear forrada con papel pergamino.
- Refrigere durante 1 hora para que se endurezca.
Cubrir con chocolate:
- A baño maría o en el microondas, derrita el chocolate amargo y el chocolate con leche junto con el aceite vegetal, revolviendo hasta que quede suave.
- Sumerge cada bola de galleta en el chocolate derretido, asegurándote de que esté completamente cubierta.
- Vuelva a colocar las bolas cubiertas de chocolate en la bandeja para hornear forrada con papel pergamino.
Adorne y enfríe:
- Espolvoree las partes superiores de las bolas rebozadas con el resto del maní picado para decorar.
- Coloque la bandeja en el refrigerador durante 20 minutos para que el chocolate se endurezca.
Atender:
- Una vez que el chocolate esté cuajado, las bolas de galleta estarán listas para servir.
- Disfruta de estas delicias frías o a temperatura ambiente.
Información adicional:
1. Variaciones de sabor:
- Si bien esta receta requiere una combinación clásica de chocolate y maní, siéntete libre de ser creativo con variaciones de sabor. Puedes experimentar con diferentes tipos de galletas, como galletas con chispas de chocolate, avena o incluso galletas de jengibre, para agregar sabores y texturas únicos a tus bolas de galletas. Además, considere incorporar otros ingredientes como coco rallado, frutas secas o incluso un toque de especias como canela o nuez moscada para darle un toque extra de sabor.
2. Sugerencias de presentación:
- Las bolas de galleta de chocolate y maní son increíblemente versátiles y se pueden servir de varias maneras para adaptarse a diferentes ocasiones. Aquí hay algunas sugerencias de presentación:
- As a dessert option at parties, potlucks, or holiday gatherings.
- Paired with a glass of cold milk or a cup of hot cocoa for a comforting treat.
- Packaged in decorative boxes or bags as homemade gifts for friends, family, or coworkers.
- Served alongside a selection of other desserts for a dessert buffet or sweet table at weddings or special events.
3. Storage and Shelf Life:
- These Chocolate Peanut Cookie Balls can be stored in an airtight container in the refrigerator for up to one week. However, they are best enjoyed within the first few days to maintain their freshness and texture. If you’re making a large batch in advance, consider freezing them in a single layer on a baking sheet until firm, then transferring them to a freezer-safe container or resealable plastic bag. When ready to enjoy, simply thaw them in the refrigerator overnight or at room temperature for a few hours before serving.
4. Recipe Adaptations:
- Don’t hesitate to customize this recipe to suit your dietary preferences or restrictions. For a vegan-friendly version, substitute the butter with vegan margarine or coconut oil, and use dairy-free chocolate. You can also make gluten-free cookie balls by using gluten-free cookies and ensuring that all other ingredients are gluten-free certified. Additionally, for a nut-free option, omit the peanuts altogether or replace them with seeds like sunflower seeds or pumpkin seeds for added crunch.
5. Make-Ahead Tips:
- To streamline the preparation process, consider making the cookie and cocoa mixtures ahead of time and storing them separately in the refrigerator until you’re ready to assemble the cookie balls. This way, you can simply combine the mixtures, form the balls, and coat them in chocolate when you’re ready to serve. It’s also a great way to plan ahead for busy days or special occasions, allowing you to enjoy freshly made Chocolate Peanut Cookie Balls with minimal effort.
6. Recipe Notes:
- When melting the chocolate for coating, be sure to do so gently and avoid overheating, as chocolate can easily seize or become grainy if exposed to high temperatures. If using a microwave, melt the chocolate in short intervals, stirring frequently to ensure even melting. Alternatively, use a double boiler or heatproof bowl set over a pot of simmering water for more precise temperature control.
- For a smoother texture in the cocoa mixture, you can sift the cocoa powder before adding it to the saucepan to remove any lumps or clumps. This will result in a velvety smooth consistency in the final cookie balls.
Conclusion: With just a few simple steps and a handful of ingredients, you can create these irresistible Chocolate Peanut Cookie Balls that are sure to be a hit with family and friends. Whether you’re hosting a party or simply treating yourself to a sweet delight, these decadent treats are bound to impress. So, roll up your sleeves, gather your ingredients, and embark on a culinary adventure to create these heavenly delights. Happy baking!
Залишити відповідь